
Power BI Interview Questions
It’s easy to create a Conditional Column in Power Query
We can add a conditional column in Power BI using Power Query to our date set. As the name says, it is a column based on 1 or more conditions applied on the other columns.
Like a custom column it also gets added to our dataset and it increases the speed as it is pre calculated and has static values unlike measures which have dynamic values.
Conditional column calculates values based on the conditional formulas.
Benefits of Conditional Column in Power BI
- Conditional column is none other than if-then logic or nested if logic which is common in the technical world.
- Creating conditional column within the query improves the processing efficiency as it decreases the data movement
Let’s know the use case of Conditional Column in Power BI using Power Query Editor by an example.

In this table we have 3 fields which are Category, Sub-category and Category sales. Category Sales shows the sub category wise sales.
Our goal is to create a new column which shows if we have achieved the target in each sub-category or not. For this we will create a column based on some condition which will tell us if we have achieved the target or not.
Let’s see how to create a Conditional Column in Power BI using Query Editor
As we know the first step is to load and transform the data to open the power query editor.
After that, go to Add column Ribbon and click on the Conditional column to open the Window, which will help us define the existing column’s condition. (As shown in below Images)
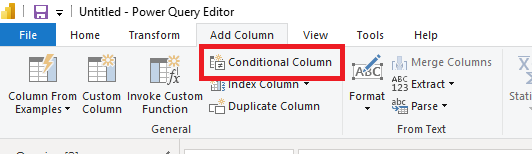

As you can see this window will ask for some parameters to add Conditional Column in Power Query:
- New Column Name: Here we must define the name of the new conditional column created in our query.
- Column Name: It is the column you must define the condition on. It will check the condition and if the condition is met it will give the favorable output else it will print the value in the else parameter.
- Operator: – it is the operation of the condition by which the query editor will check the condition
- Value: – this is the value which will be used as a comparison to check whether the condition is met or not
- Output: – it is the value which will be printed if the condition is true
- Else clause: – It is the value which will be shown if the condition is not met.
After defining the above condition, click OK. At this point of time, we will get the output we want, and a new field is added to our query which is named Target which will hold the values based on our defined condition. (as you can see in the image below)

Note:
- By using Conditional Column in Power Query, we can skip complex DAX function statements and directly ass conditions for which Power Query itself will write a DAX function for us as you can see in the above Image.
- By using Conditional Column in Power Query, we can categorize or make bins of our data using defined functions.
Conclusion
In conclusion, creating Conditional Column in Power BI using Power Query Editor gives us advantages in data transformation and prepare it for analysis. By using the If-then or nested if logic, we can efficiently obtain new insights which will help us in further analysis.
This practice not only helps us in derive new insights but also helps us to have better consistency and accuracy in reporting outputs. Eventually, Conditional column allow us to effectively manage and transform the data according to our specific business requirements, helping in decision making and improving overall practices.
Another way to create conditional columns in Power BI is using DAX function (IF Function), Which we have covered in detail later of this course.
Add comment